Crystal Systems and the \(a, b, c\) Axes
(Under construction)
Three-dimensional space groups are classified into 230 types from a group-theoretical perspective. Every space group contains an infinite number of translational operations, and we humans choose three independent ones from among them, naming them the \(a, b, c\) axes. Of course, no matter which ones are chosen or in what order, the properties of the space group (i.e., the properties of the crystal) do not change. One might think that any choice should be fine, but early crystallographers decided it would be better to establish certain guidelines to eliminate individual differences. This page provides a rough explanation of the principles used to choose the \(a, b, c\) axes in the standard notation of space groups.
The first principle is to choose the \(a, b, c\) axes in a right-handed system. Without this convention, confusion would arise—for example, the rotation direction of a screw axis \(3_1\) could differ from person to person.
The second principle is to select three translation vectors that are as short as possible, minimizing the volume of the parallelepiped they form. Such a lattice is called a primitive lattice. However, if the shape of the primitive lattice does not satisfy the symmetry of the point group to which the space group belongs, this principle is ignored (see the page “1.3. Lattice Constants, Crystal Systems, and Bravais Lattices“). In the cubic crystal system, following this principle alone uniquely determines the cubic unit cell (\(a, b, c\) are equivalent, so they can be chosen in any order). However, for other crystal systems, this principle alone does not uniquely determine the crystal lattice.
The third principle is to assign a unique symmetry direction to a specific axis. This is best understood from the following table. In space group notation, symmetry elements are listed along the primary axis (unique direction with the highest symmetry), the secondary axis (next highest), and the tertiary axis, in that order. The settings of the primary and secondary axes for each crystal system are summarized below (this was already introduced in section 1.3.).
| Crystal system | Primary Main axis | Secondary Sub-axis 1 | Tertiary Sub-axis 2 |
|---|---|---|---|
| Triclinic (triclinic) | – | – | – |
| Monoclinic (monoclinic) | \(b\) | – | – |
| Orthorhombic (orthorhombic) | \(a\) | \(b\) | \(c\) |
| Tetragonal (tetragonal) | \(c\) | \(a=b\) | \([110]\) = \([1\bar{1}0]\) |
| Trigonal (Trigonal) Hexagonal (hexagonal) | \(c\) | \(a\) = \(b\) = \([\bar{1}\bar{1}0]\) | \([1\bar{1}0]\) = \([120]\) = \([\bar{2}\bar{1}0]\) |
| Cubic (cubic) | \(a\) = \(b\) = \(c\) | \([111]\) = \([\bar{1}11]\) = \([1\bar{1}1]\) = \([11\bar{1}]\) | \([110]\) = \([1\bar{1}0]\) = \([011]\) = \([01\bar{1}]\) = \([ 101]\) = \([\bar{1}01]\) |
Let us elaborate a bit more in words.
- Triclinic: No unique direction exists, so there are no guidelines. However, it is common to choose \(a, b, c\) so that \(\alpha,\beta,\gamma\) are as close to 90° as possible.
- Monoclinic: Has a rotation, rotoinversion, screw, mirror, or glide of order 2. The shortest translation vector along that direction is taken as the \(b\) axis. Two short translation vectors perpendicular to the \(b\) axis are chosen as the \(a, c\) axes. However, some arbitrariness remains in this choice.
- Orthorhombic: Has three mutually orthogonal rotations, rotoinversions, screws, mirrors, or glides of order 2. The shortest translation vectors along these three directions are taken as the \(a, b, c\) axes. However, arbitrariness remains in the order of assignment.
- Tetragonal: Has a rotation, rotoinversion, or screw of order 4. The shortest translation vector along that direction is taken as the \(c\) axis. The shortest translation vector perpendicular to the \(c\) axis is taken as the \(a\) or \(b\) axis. Since \(a\) and \(b\) are equivalent, they can be chosen in any order.
- Trigonal, Hexagonal (hexagonal lattice): Has a rotation, rotoinversion, or screw of order 3 or 6. The shortest translation vector along that direction is taken as the \(c\) axis. The shortest translation vector perpendicular to the \(c\) axis is taken as the \(a\) or \(b\) axis. Since \(a\) and \(b\) are equivalent, they can be chosen in any order.
- Trigonal (rhombohedral lattice): Has a rotation or rotoinversion of order 3. The shortest translation vectors oblique to this direction are taken as the \(a, b, c\) axes. Since \(a, b, c\) are equivalent, they can be chosen in any order.
As you may have already realized, even following the third principle, the \(a, b, c\) axes cannot be uniquely determined for the triclinic, monoclinic, orthorhombic, and trigonal crystal systems.
For the triclinic system, since there is no unique direction, there is no way to establish a universally agreed-upon choice of \(a, b, c\) axes. However, there is no confusion because the space group notation does not change regardless of the choice.
For the trigonal system, both the hexagonal setting and rhombohedral setting can be adopted. There is no rule giving priority to one over the other, and both cases are listed side by side in the International Tables. For details, please see the page “6.1. Topics on the Trigonal/Hexagonal Crystal System“.
The remaining cases—monoclinic and orthorhombic—where the \(a, b, c\) axes cannot be uniquely determined, will be explained below.
The Orthorhombic Case
First, let us consider the orthorhombic case. As mentioned above, even after following the three principles, the \(a, b, c\) axes of the orthorhombic system are not uniquely determined. This is because some people may want to assign \(a, b, c\) in order of decreasing axis length, while others may want to correlate them with the crystal structure (atomic positions). Of course, you are free to choose as you like, but doing so may result in a notation that does not match the standard space group notation. Here we explain axis settings in the orthorhombic system.
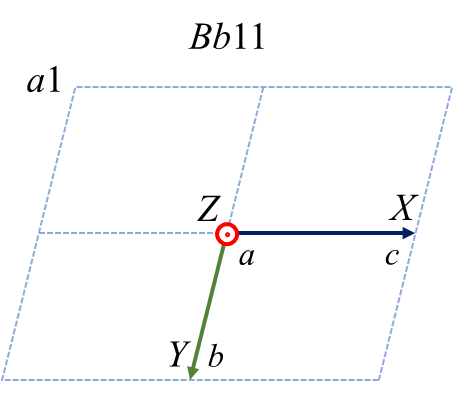
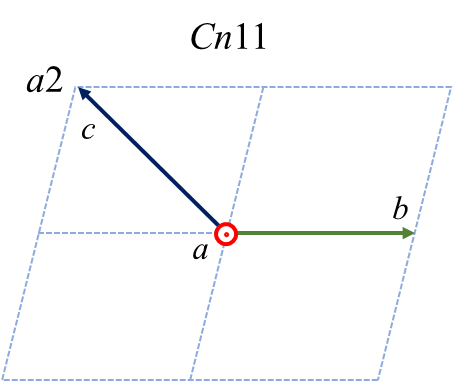
There is a space group called \(Pma2\) belonging to the orthorhombic system. This space group has an \(m\) mirror perpendicular to the \(a\) axis, an \(a\) glide perpendicular to the \(b\) axis, and a twofold rotation parallel to the \(c\) axis. If everyone adopts the notation \(Pma2\), then each axis is associated with a unique symmetry operation, so there is no confusion in choosing \(a, b, c\). However, what if someone wants to change the axis setting for some reason? To accommodate this request, not only the axis setting but also the space group notation must be changed. Considering all possible assignments of \(a, b, c\) axes to three orthogonal directions while maintaining a right-handed system, we find that there are six possible cases as shown below.
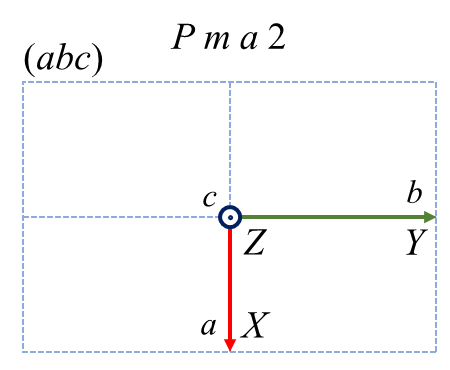
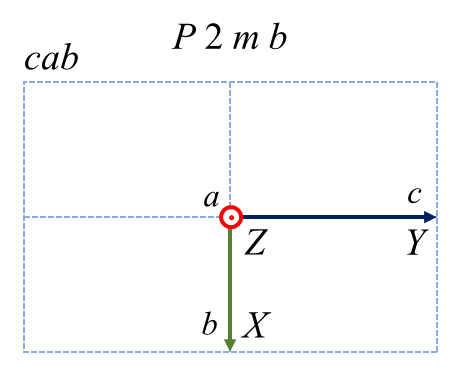
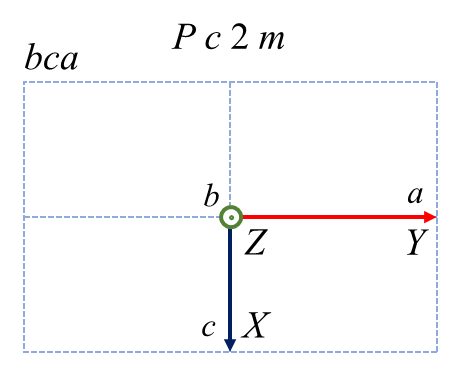


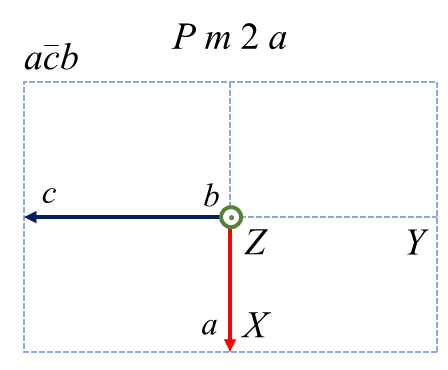
Red, green, and blue correspond to the \( a, b, c\) axes. The upper left is the standard axis setting, and the others are non-standard. The symbols such as \(ba\bar{c}\) written in the upper left of each figure are auxiliary symbols1 representing axis settings. The upper row shows cases where \( a, b, c\) are cyclically permuted, with the positive directions of each axis preserved. The lower row shows cases where one axis is preserved and the other two are swapped, resulting in the reversal of one axis direction. Although the six cases have different space group notations, they all exhibit exactly the same space group properties. None is superior to the others, but it was decided long ago that \(Pma2\) would be the standard. Note that in the orthorhombic system, it is not always the case that the notation changes as in this example. For instance, space groups such as \(P222\) and \(Pmmm\) have the same symbol in all three directions, so the notation does not change even if the order of \( a, b, c\) is altered.
Unless there are special circumstances, the standard space group notation and axis setting should be used. However, for historical reasons (e.g., when non-standard notation has been adopted in older literature) or when one wants to consider the relationship of lattice constants before and after a phase transition, it may be better to use a non-standard space group. In that case, be aware that you must also transform the atomic positions as shown below.
| \(cab\) | \(bca\) | \(ba\bar{c}\) | \(\bar{c}ba\) | \(a\bar{c}b\) | |
|---|---|---|---|---|---|
| Transform from \(abc\) | $$z, x, y$$ | $$y, z, x$$ | $$y,x,\bar{z}$$ | $$z,y,\bar{x}$$ | $$x,z,\bar{y}$$ |
| Transform to \(abc\) | $$y, z, x$$ | $$z, x, y$$ | $$y,x,\bar{z}$$ | $$\bar{z},y,x$$ | $$x,\bar{z},y$$ |
The Monoclinic Case
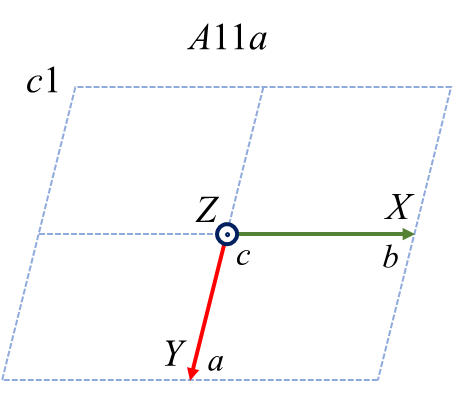
Space groups of the monoclinic system always contain a symmetry operation of order 2 (a rotation, rotoinversion, screw, mirror, or glide). Making this unique direction coincide with the \(b\) axis is the IUCr (International Union of Crystallography) standard, and this setting is called the 2nd setting. The 1st setting and 3rd setting define the \(a\) and \(c\) axes, respectively, as the unique direction, but these are non-standard. Why not make the \(a\) or \(c\) axis the standard? It does seem inconsistent, and most people would think so, but this was decided long ago, and we have no choice but to accept it.
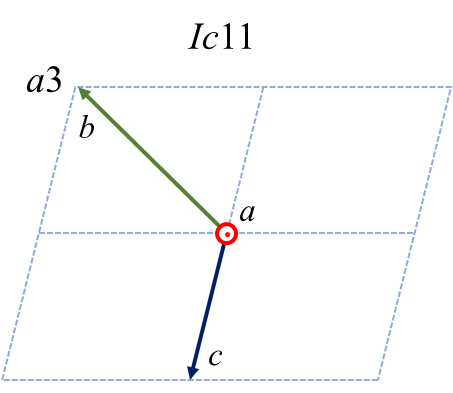
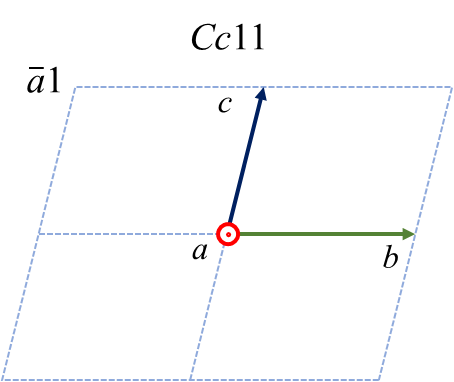
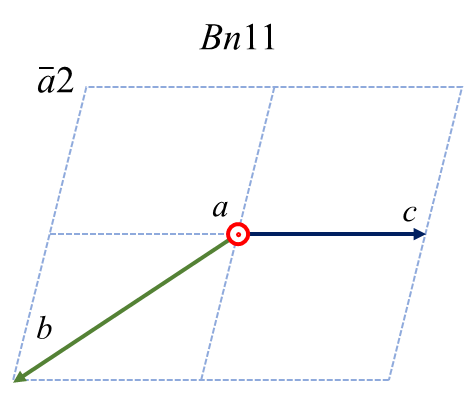
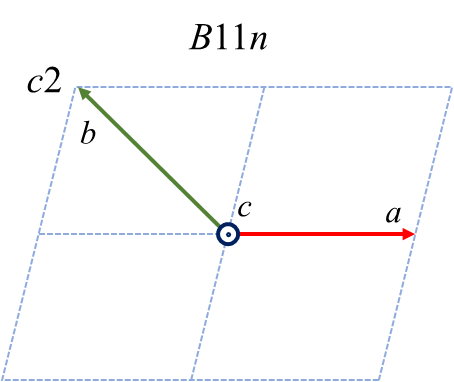
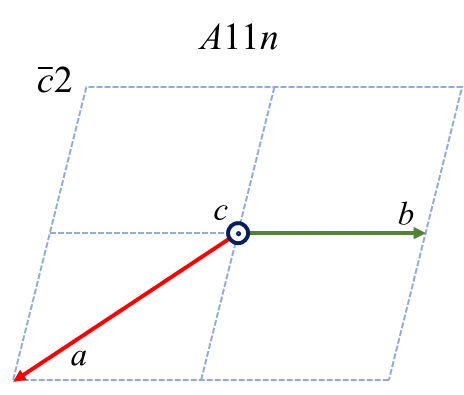
Among the monoclinic space groups, there is one called \(Cc\). This space group has a \(C\) centered lattice and a \(c\) glide plane perpendicular to the principal axis (\(b\) axis) as its symmetry operations. Since the translation vector of the centered lattice is \(\frac{a+b}{2}\) and the translation vector of the \(c\) glide plane is \(\frac{c}{2}\), the remaining \(a, c\) axes are automatically determined by this notation. Now, suppose a contrarian thinks “I’m fine with the \(b\) axis as the principal axis, but I want to choose the \(a, c\) axes freely.” Then they would notice there are the following six cases. (Note: To make the principal axis explicit, the space group is written as \(C1c1\) instead of \(Cc\).)
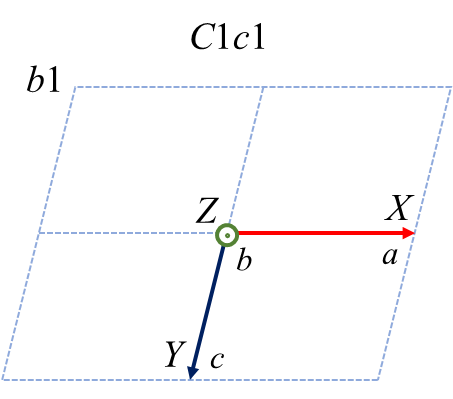
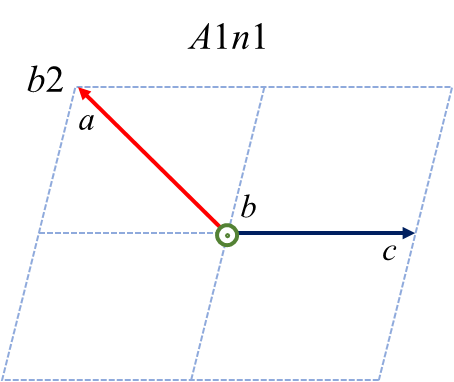
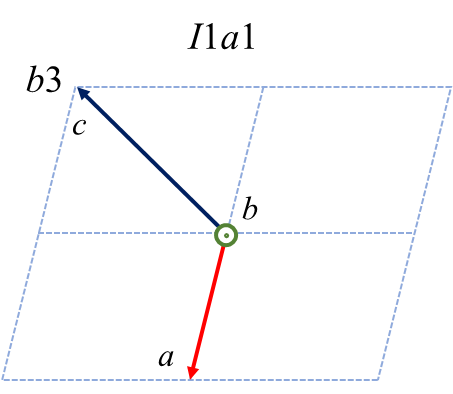
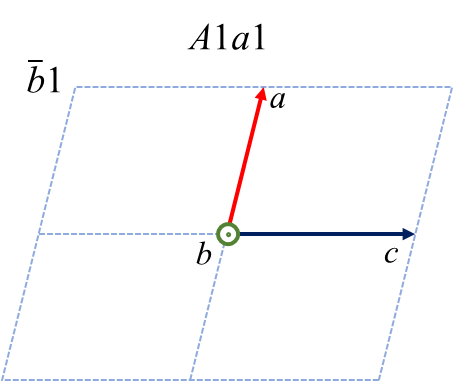
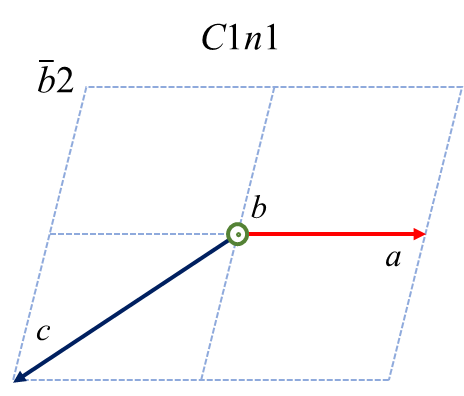
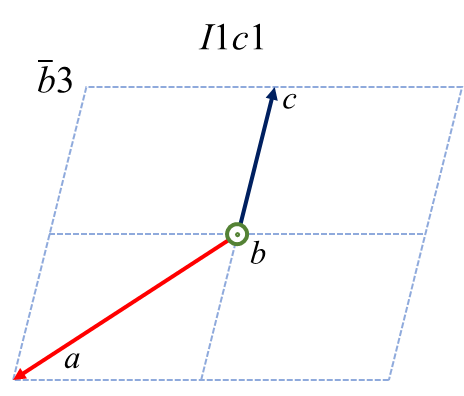
Red, green, and blue correspond to the \( a, b, c\) axes. The direction perpendicular to the paper and pointing toward the viewer is the principal axis. Although the symbols of the centered lattice and glide plane change, which may seem confusing, all six cases are in the 2nd setting, and the unit cell volume is the same. There is no superiority among them. One might then wonder why \(C1c1\) was adopted as the standard notation, but I am not familiar with the historical background. Since there is no mathematical reason to choose one over another, it was probably decided long ago by someone’s preference.
The symbols \(b1, b2\), etc. in the figures above are auxiliary symbols2 representing axis settings. The information for converting atomic positions in a crystal expressed in the standard setting to a non-standard setting, or for the reverse transformation, is summarized below.
| \(b2\) | \(b3\) | \(\bar{b}1\) | \(\bar{b}2\) | \(\bar{b}3\) | |
|---|---|---|---|---|---|
| Transform from \(b1\) | $$\bar{z}, y, x+\bar{z}$$ | $$z+\bar{x}, y, \bar{x}$$ | $$\bar{z}, y, x$$ | $$x+z, y, z$$ | $$\bar{x}, y, \bar{x}+\bar{z}$$ |
| Transform to \(b1\) | $$z+\bar{x}, y, \bar{x}$$ | $$\bar{z}, y, x+\bar{z}$$ | $$z, y, \bar{x}$$ | $$x+\bar{z}, y, z$$ | $$\bar{x}, y, x+\bar{z}$$ |
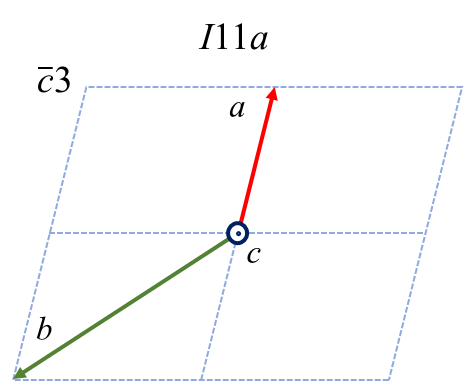
Now, there may be even more contrarian individuals who want to make not the \(b\) axis but the \(a\) or \(c\) axis the principal axis. First, we show the six cases and conversion methods when \(a\) is the principal axis.

| \(a1\) | \(a2\) | \(a3\) | \(\bar{a}1\) | \(\bar{a}2\) | \(\bar{a}3\) | |
|---|---|---|---|---|---|---|
| Transform from \(b1\) | $$y, z, x$$ | $$y, x+\bar{z}, \bar{z}$$ | $$y, \bar{x}, z+\bar{x}$$ | $$y, x, \bar{z}$$ | $$y, z, x+z$$ | $$y, \bar{x}+\bar{z}, \bar{x}$$ |
| Transform to \(b1\) | $$z, x, y$$ | $$y+\bar{z}, x, \bar{z}$$ | $$\bar{y}, x, z+\bar{y}$$ | $$y, x, \bar{z}$$ | $$z+\bar{y}, x, y$$ | $$\bar{z}, x, z+\bar{y}$$ |
Finally, we show the six cases and conversion methods when \(c\) is the principal axis.


| \(c1\) | \(c2\) | \(c3\) | \(\bar{c}1\) | \(\bar{c}2\) | \(\bar{c}3\) | |
|---|---|---|---|---|---|---|
| Transform from \(b1\) | $$z, x, y$$ | $$x+\bar{z}, \bar{z}, y$$ | $$\bar{x}, z+\bar{x}, y$$ | $$x, \bar{z}, y$$ | $$z, x+z, y$$ | $$\bar{x}+\bar{z}, \bar{x}, y$$ |
| Transform to \(b1\) | $$y, z, x$$ | $$x+\bar{y}, z, \bar{y}$$ | $$\bar{x}, z, y+\bar{x}$$ | $$x, z, -y$$ | $$y+\bar{x}, z, x$$ | $$\bar{y}, z, y+\bar{x}$$ |